
Winterizing Investment Properties: A Step-by-Step Guide for Real Estate Owners
Introduction: Why Winterization Matters for Investment Properties
Winter can be one of the most challenging seasons for real estate investors. Harsh weather, freezing temperatures, and unpredictable storms pose serious risks to homes, apartments, and multi-unit buildings. Without proper preparation, properties are vulnerable to frozen pipes, ice dams, roof leaks, HVAC failures, and costly insurance claims. In fact, winter-related damage is a leading cause of property loss, often resulting in unexpected expenses, tenant complaints, and even legal liability for owners.
Unlike primary residences, investment properties may sit vacant for stretches of time or be occupied by tenants who are less vigilant about seasonal maintenance. This makes proactive winterization essential—not just for preserving property value, but also for maintaining tenant satisfaction and staying compliant with insurance policies and local codes. Winterizing is not just for luxury homes in snowy climates; it’s a smart practice for any property owner who wants to minimize risks and avoid preventable repairs, whether you’re managing a single rental or an entire portfolio.
This comprehensive, step-by-step guide will walk you through the winterization process for investment properties. We’ll cover must-do tasks, recommended tools and materials, safety considerations, compliance checks, and professional tips to ensure your property weathers the winter safely. Whether you’re a first-time investor or a seasoned landlord, following these detailed steps will help you protect your investment, save money, and provide peace of mind.
Understanding the Risks: Common Winter Damage to Investment Properties
Frozen and Burst Pipes
Pipes are especially vulnerable in unheated areas, vacant units, or older buildings with insufficient insulation. When water freezes inside pipes, it expands, increasing the risk of bursting. This can lead to extensive water damage, mold growth, and expensive repairs.
Ice Dams and Roof Leaks
Ice dams form when heat escapes from the roof, melting snow that then refreezes at the eaves. This traps water on the roof, leading to leaks, damage to insulation, ceilings, and walls, and potentially hazardous icicles.
HVAC System Failures
Furnaces and heat pumps are under heavy load during winter. Poor maintenance or malfunctioning components can cause breakdowns, leaving tenants without heat and potentially violating habitability standards.
Gutter and Drain Blockage
Clogged gutters and downspouts can overflow, causing water to pool around foundations or freeze on walkways, creating slip hazards and structural issues.
Exterior and Grounds Hazards
Snow and ice buildup on walkways, driveways, and stairs can cause slips and falls—one of the most common sources of liability claims for property owners.
Pre-Winter Assessment: Inspecting Your Property
Schedule a Thorough Walkthrough
- Interior: Check for drafts, inspect windows and doors for gaps, look for signs of leaks, test smoke and CO detectors, and ensure all heating systems are functional.
- Exterior: Examine the roof, gutters, siding, and foundation for damage. Look for overhanging branches, cracked walkways, and areas prone to ice accumulation.
Review Previous Winter Issues
Consult maintenance logs, tenant reports, and insurance claims from past winters. Pay special attention to recurring problems like cold rooms, frozen pipes, or frequent HVAC repairs.
Check Compliance Requirements
Review local ordinances and landlord-tenant laws regarding minimum heating requirements, snow removal, and tenant notifications for scheduled maintenance. Check your insurance policy for winterization clauses or exclusions.
Essential Winterization Tasks: Step-by-Step
1. Protect Plumbing
- Insulate Exposed Pipes: Use foam pipe insulation sleeves or wrap pipes in unheated spaces like basements, crawl spaces, and garages.
- Shut Off and Drain Outdoor Faucets: Close the interior shutoff valve, open the exterior spigot, and drain any remaining water. Use faucet covers for added protection.
- If Vacant: Consider draining all water lines and adding non-toxic antifreeze to P-traps and toilets.
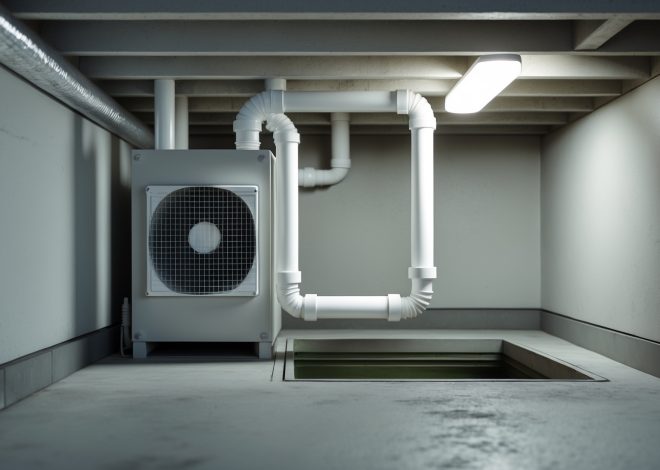
2. Maintain Heating Systems
- Service HVAC Units: Schedule a professional inspection and cleaning of furnaces, heat pumps, and boilers. Replace filters and check for carbon monoxide leaks.
- Test Thermostats: Ensure all thermostats are functional and programmed for energy efficiency. Install smart thermostats or low-temperature alarms in vacant units.
- Check Radiators and Baseboards: Bleed air from radiators and ensure all heat sources are unobstructed.
3. Seal Drafts and Insulate
- Weatherstrip Doors and Windows: Replace old weatherstripping, caulk gaps, and install door sweeps.
- Add Insulation: Top up attic insulation and insulate basement rim joists to minimize heat loss.
- Install Storm Windows or Plastic Film: Use temporary plastic film over windows for added insulation if storm windows are not available.
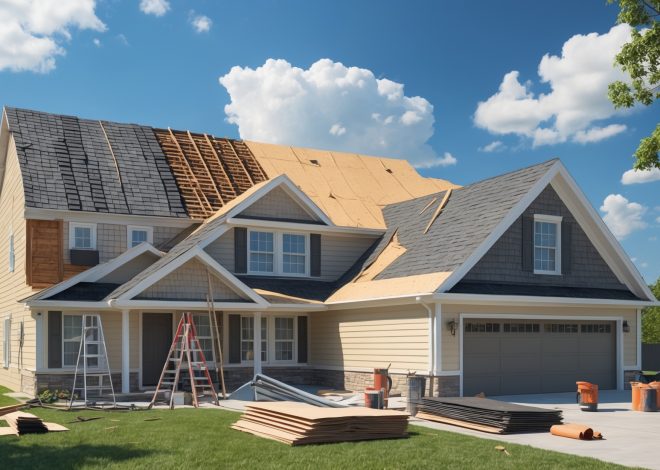
4. Roof and Gutter Maintenance
- Inspect the Roof: Look for missing shingles, damaged flashing, or signs of leaks. Arrange for repairs before the first snow.
- Clean Gutters and Downspouts: Remove leaves and debris to ensure proper drainage. Install gutter guards if needed.
- Check Attic Ventilation: Proper ventilation prevents ice dam formation and regulates attic temperature.
5. Exterior Preparations
- Trim Trees and Shrubs: Remove dead branches that could break under snow or ice and damage the property.
- Seal Foundation Cracks: Use caulk or expanding foam to seal gaps and prevent cold air and rodents from entering.
- Check Outdoor Lighting: Ensure pathways are well-lit to reduce slip hazards in icy conditions.
6. Safety and Compliance Measures
- Test Smoke and CO Detectors: Replace batteries and test all detectors; install additional units if required by code.
- Stock and Mark Emergency Shutoffs: Clearly label water, gas, and power shutoff valves for emergency access.
- Prepare for Power Outages: Provide tenants with emergency contact numbers and instructions. Consider backup generators for critical systems.
- Update Tenant Communication: Send winter preparedness tips and emergency procedures to tenants. Clarify responsibilities for snow removal and heating complaints.
7. Grounds and Common Areas
- Arrange for Snow and Ice Removal: Hire a contractor or provide snow shovels and ice melt for tenants. Mark the boundaries of driveways and walkways for snow plows.
- Check Outdoor Equipment: Service snow blowers and ensure there is adequate supply of salt or sand.
Tools and Materials Checklist for Property Winterization
- Foam pipe insulation sleeves and heat tape
- Weatherstripping kits and caulking gun
- Programmable or smart thermostats
- Plastic window insulation film
- Attic insulation batts or blown-in insulation
- Roof rake for snow removal
- Gutter cleaning tools and gloves
- Smoke and CO detector batteries
- Snow shovels, ice melt, sand
- Emergency kit: flashlights, batteries, portable heaters (for vacant properties)
- First aid kit and contact list for local contractors
Special Considerations for Vacant Properties
Shutting Down Utilities Safely
If a property will be vacant for an extended period, consider shutting off and draining the water supply, turning off the water heater, and unplugging appliances. Leave the heat on at a low setting (usually 55°F/13°C) to prevent freezing.
Security Measures
Install motion-activated lights and security cameras to deter break-ins. Schedule regular property checks or hire a property management company for routine inspections during winter months.
Insurance Notification
Many insurance policies require notification if a property is vacant for more than 30 days. Confirm coverage for winter-related damages and ask about vacant property endorsements.
Tenant-Focused Winterization: Communication and Responsibility
Notifying Tenants of Scheduled Maintenance
Provide advance notice for any winterization work that requires access to their units. Explain the importance of keeping heat set to a minimum level, especially when away for holidays.
Clarifying Responsibilities
Specify in the lease who is responsible for snow and ice removal, changing furnace filters, and reporting maintenance issues. Provide clear guidelines in writing to avoid disputes.
Sharing Winter Safety Tips
- Instruct tenants not to block heating vents with furniture or curtains.
- Advise against using ovens or space heaters as primary heat sources.
- Encourage prompt reporting of leaks, drafts, or malfunctioning equipment.
- Remind tenants to keep walkways clear of snow and ice as applicable.
Compliance and Documentation
Local Codes and Ordinances
Stay informed about city or HOA requirements for heating, snow removal, and emergency preparedness. Some areas impose fines for failing to clear sidewalks within a certain timeframe after snowfall.
Insurance Documentation
Keep detailed records of all winterization work, including receipts, photos, and contractor invoices. This documentation is critical for insurance claims if damage occurs.
Maintenance Logs
Update your property maintenance log with dates, tasks performed, and any issues discovered. This helps track recurring problems and demonstrates due diligence.
When to Hire Professionals
- HVAC Servicing: Annual inspections should be performed by licensed technicians.
- Roof and Gutter Repairs: Hire a professional for repairs or if working at heights is unsafe.
- Plumbing Winterization: For complex systems or vacant properties, consider a plumber to drain lines properly and add antifreeze.
- Tree Trimming: Large limbs near power lines or roofs should be handled by certified arborists.
Cost Breakdown: Budgeting for Winterization
Typical Expenses
- Pipe insulation and weatherstripping: $100–$300 per property
- HVAC servicing: $100–$250
- Roof/gutter inspection: $150–$400
- Snow removal (contractor): $50–$150 per visit, or $500–$2,000/season
- Insulation upgrades: $500–$2,000 (varies by property size)
Hidden Costs to Watch For
- Emergency repairs due to burst pipes or roof leaks
- Insurance deductibles for winter-related claims
- Increased utility bills if insulation or weatherproofing is insufficient
- Fines for non-compliance with local ordinances
Conclusion: Safeguarding Your Investment Through Winter
Winterization is not just a seasonal chore—it’s a critical part of responsible property management and investment protection. By taking a proactive, step-by-step approach, you can minimize the risk of costly damage, avoid insurance headaches, and keep your tenants safe and satisfied. Remember, neglecting winter preparation can quickly turn minor issues into major disasters. Water damage from burst pipes, roof leaks, and slip-and-fall accidents are not just inconvenient—they can erode your return on investment and damage your reputation as a landlord.
Smart investors know that a few hours of preparation and a modest investment in materials can pay off tenfold in avoided repairs and emergencies. Use the checklist and recommendations in this guide to create a tailored winterization plan for your properties. Keep clear communication with tenants, stay compliant with local rules, and document all your efforts for peace of mind and strong insurance protection.
If you’re unsure about any task, don’t hesitate to consult with professionals—plumbers, HVAC contractors, roofers, or property managers—who can ensure the job is done right. Ultimately, winterizing your investment properties is about more than just surviving the cold months; it’s about building resilience, protecting your assets, and ensuring your investments continue to thrive, season after season.
8 thoughts on “Winterizing Investment Properties: A Step-by-Step Guide for Real Estate Owners”
Leave a Reply
Related Posts
Understanding Real Estate Roof Replacement: Cost Planning, Permit Steps, and Maintenance Tips

Spring Exterior Maintenance Checklist for Real Estate Owners: Protecting Curb Appeal and Property Value
For investment properties that are vacant for several weeks at a time, what specific measures do you recommend to prevent frozen pipes, beyond the basics like shutting off water and draining lines?
Beyond shutting off water and draining lines, consider adding pipe insulation, especially in unheated areas like basements and crawl spaces. Use heat tape or heat cables on vulnerable pipes for extra protection. Keep the thermostat set to at least 55°F, even if the property is vacant, and open cabinet doors under sinks to allow warm air to circulate. It also helps to seal cracks and gaps near pipes to block cold drafts.
You mention insurance compliance as a reason to winterize. Could you clarify what kind of insurance issues might arise if I skip some of these steps, especially in older multi-unit buildings?
If you skip winterizing tasks, especially in older multi-unit buildings, insurance claims could be denied for damages like burst pipes or water leaks. Insurers may determine that neglecting basic maintenance is responsible for the loss, labeling it as ‘owner negligence.’ This could leave you covering repair costs out of pocket. Regular winterization helps prove you took reasonable steps to prevent damage, keeping your coverage valid.
The article mentions legal liability if properties are not properly prepared for winter. Could you clarify what types of winter-related legal problems landlords might face and how winterization specifically helps avoid them?
Landlords can face legal issues like tenant injury claims if someone slips on icy steps, or lawsuits for property damage if pipes burst and cause flooding. Local laws often require property owners to maintain safe and livable conditions. Proper winterization, such as insulating pipes, clearing walkways, and maintaining heating systems, helps prevent accidents, damage, and the legal consequences that may follow if these problems are not addressed.
A lot of the steps sound important but potentially expensive. Is there a recommended order to prioritize winterization tasks if my maintenance budget is limited this season?
If your budget is limited, start with tasks that protect your property from the most costly damage. First, ensure the plumbing is winterized to prevent frozen pipes. Next, address roof and gutter maintenance to avoid water leaks. After that, check your heating system and seal gaps around doors and windows. Prioritizing these steps helps reduce the risk of major repairs later.